Training Tips is a series written by the climbing coaches from Redpoint Training. If you’re looking to improve your climbing, check out the Redpoint Assessment. You’ll walk away from your Assessment with the knowledge of your opportunities for growth and a personalized plan to help you make gains.
Strengthening Those Digits
Finger strength is something everybody wants in the climbing community, but few want to do the work to get develop it. Why? Well, finger strength is probably the most grueling thing to train. If you want it, you’ll have to bust out that darn hangboard!
Increasing your finger strength as a climber provides massive benefits, not only in how hard you can crank on a hold, but how small of a hold can you rest on and how static you can move from crimp to crimp. Generally you will see the most benefit from training finger strength once you’ve mastered the climbing technique needed for the grades you currently “project” (work multiple times to figure out) but lack the finger strength to pull through moves or recover enough to finish the climb before falling.
When your finger strength is higher, your forearms take longer before entering “endurance mode”, when you start to feel that “pumpy”, swollen feeling. So it really is a win-win for your climbing ability as a whole.
The best way to develop finger strength is with a hangboard, a board that features a variety of hold sizes and types. There are many different styles of hangboards out there, and each First Ascent facility features multiple hangboards so you can find the type that will support the hangboard workout you would like to do.
How To Hangboard
Important Disclaimer: hangboarding is for intermediate and advanced climbers who have been climbing for 2 years or longer. Hangboarding puts significant strain on your finger tendons, and unless your tendons have been developed by significant climbing experience, they will be prone to injury from hangboard workouts. If you’ve been climbing less than 2 years, there are other training methods that can increase your finger strength more safely. Only add hangboarding to your climbing training routine if you know you’re ready for it. If you’re unsure, seek qualified instruction.
There is no sugar coating it: hangboarding is not the most fun workout. In fact, it can be difficult and mundane. But it arguably will give you the most benefits of any climbing workout. You’re going to have to learn to become a sort of masochist, but the gains will make it all worth it.
I want to help you get started, so I’m going to share 4 things that I do to stay the course for my 3-4 weeks of hangboarding 3-4 times a year. Then, I’ll share the most popular workout that I use to train myself and teach my clients to use.
Four Tips For Successful Hangboarding
Tip 1: make sure to have a clear goal for your training plan, whether it’s a grade, a trip, or a general level of fitness. Define what that goal means to you. Really drill in and define it. You will need this goal when all of the excuses for not following through with your training plan pile up – and believe me, they will. Have a picture of your goal climb as the wallpaper on your phone or on your mirror in your bathroom.
Tip 2: have a great go-get-it playlist. Something that gets you pumped up and excited to try hard. I personally like hip hop or rap music. Turn the music up and get focused.
Tip 3: follow a really solid warm up routine. Listen to that music, and slowly get yourself amped and focused. I like to use a 20 minute ARCing session to warm up (see my last post for more on ARCing).
Tip 4: do the workout in it’s entirety. It’s easy to call it a quits 3/4 ‘s of the way and say you’ve done enough. The people who are getting the most out of their sport are the ones who stick it out until the end.
Now for the workout!
The Workout
Below I’ll describe a basic “how to” for hangboarding, but I recommend scheduling a session with a Redpoint Coach to make sure you are hangboarding with proper form to protect your finger tendons, shoulders, and other joints.
Pick 6 to 8 Holds on your hangboard. Make sure two are crimps, one is a larger edge, and one a smaller edge. Try and pick holds that are on your goal route or in your goal area. The first hold you use should be the big jugs on the hangboard for a warm up hang.
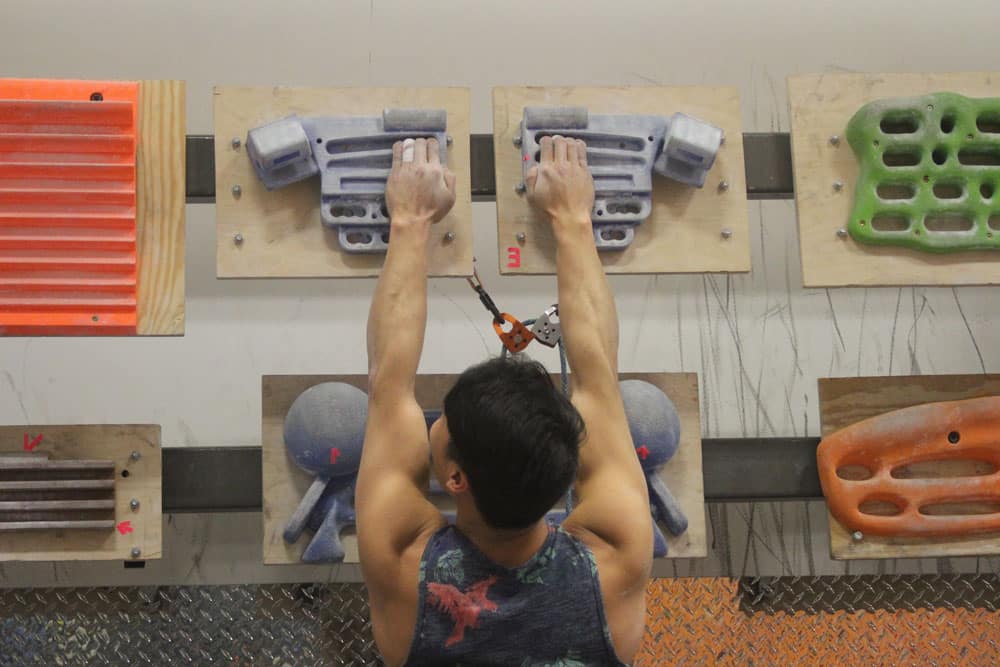 Hold on to each hold to test them out. For holds that feel very difficult, start with negative weight on a pulley system, especially if you are in your first season of hangboard training. Injury prevention is the goal here. You can take weight off by wearing a harness and clipping weight into the pulley system on the hangboard stations. Take off 20lbs to start, then work up to body weight from there.
For each hang rep, slowly sink into each hold and take the weight onto your shoulders, then remove your feet from the ground. Keep your elbows slightly bent, not locked, and keep the shoulders engaged to prevent injury.
Here are your sets:
Warm up jugs
7 reps of 7 Seconds on 3 seconds off
3 minutes rest
Set 1: 6-8 hold types
7 reps of 7 seconds on 3 seconds off
3 minutes rest
Switch holds
Set 2: 6-8 hold types
Option to add 5 lbs if you did not fail on the 7th rep of Set 1
6 reps of 6 seconds on 3 seconds off
3 minutes rest
Switch holds
Lastly, hangboarding is very hard on your fingers, so make sure to take 2 days off between each workout for adequate rest. Hangboard every 3 days for 3-4 weeks. Remember to find ways to enjoy it, make your goals clear, and stay consistent. After 4 weeks, you’re ready to move on to training for power.
Until next time, enjoy your gains!
-Branden LaCour
Learn more about Branden and his tips for training at www.thesendingcoach.com.